In the previous article, the author introduced the concept of white layer as a reference to discuss the influence of PCBN hard cutting and dry and wet cutting on the workpiece.
1. Experimental conditions
In the experiment, the AM-BORITE series DBC50 PCBN tool of the original De Beers company was selected. It is a PCBN tool with better performance for cutting hardened steel on the market. Its composition and performance are shown in the following table. The content of the tool is low, and the binder is TiC.

Table 1—Chemical composition and properties of cutting tools
The workpiece material is the hardened bearing steel GCr15 widely used in the manufacture of bearings as the experimental material, and its chemical composition is shown in the following table. GCr15 is quenched by 850 ℃ oil, its average hardness is HRC60, and its metallographic structure is acicular martensite, carbide and a small amount of retained austenite.

Table 2—Chemical composition of bearing steel GCr15
The experiment was carried out on a CA6140 lathe with external cutting. Considering the time and the experimental effect, the cutting amount in this experiment is too large, the cutting speed Vc=130m/min, the cutting depth ap=0.2mm, the feed rate f=0.15mm/r; the lubrication conditions are dry cutting and wet cutting (emulsification). liquid) two kinds.
The geometric parameters of the tool after clamping are -6° for the rake angle, 6° for the relief angle, 0° for the edge inclination, 95° for the main declination, 5° for the secondary declination, 0.8mm for the radius of the tool nose arc, and the negative chamfer is - 20°×0.2mm.
According to the stage of tool wear, the samples were sampled 3 times for dry and wet cutting (early stage, middle stage, and later stage), and the samples were numbered.
Then, the serial numbered samples are cut axially by a wire cutting machine to obtain a small sample with a length of 10 mm. A small section of the sample was embedded in the resin, polished with metallographic sandpaper, and the cross-section was polished, and then lightly corroded with 4% nitric acid to make a metallographic sample. Finally, the micromorphological changes of the machined surface of the metallographic samples and the surface topography of the machined workpiece were observed under the JSM-5600LV scanning electron microscope.
2. The workpiece section organization analysis

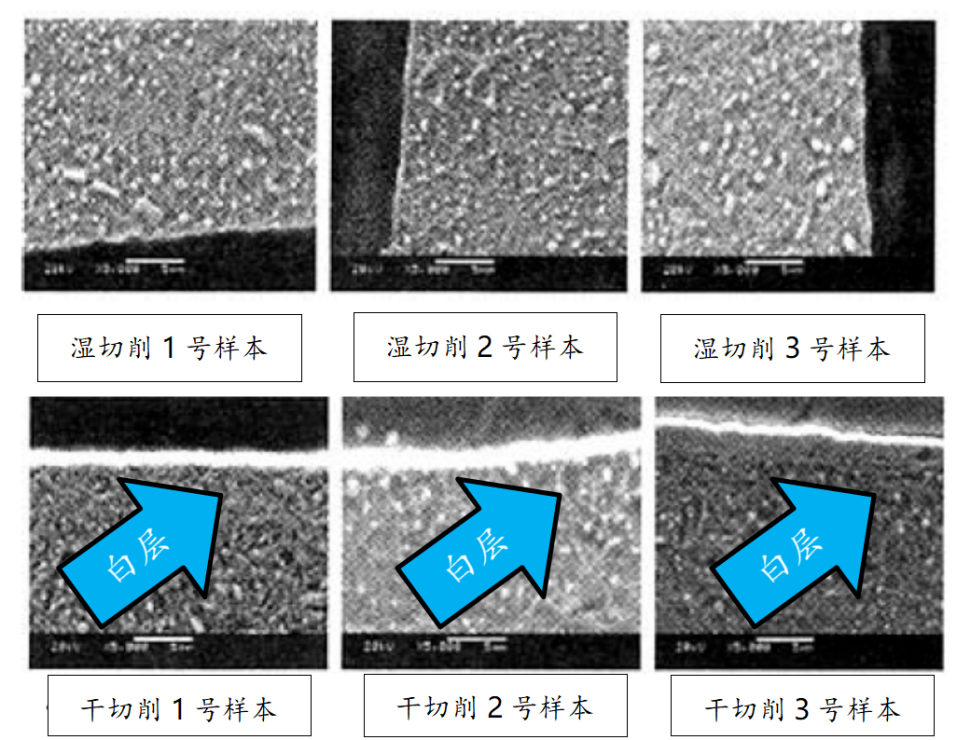
Figure - Morphology of white layer in various periods during dry and wet cutting
The pictures in the upper group are SEM pictures of the white layer on the surface of the samples at various times under dry and wet cutting conditions.
It can be seen from the SEM pictures that during dry cutting, four areas with different structures appear from the surface of the workpiece to the core of the workpiece:
1. The first narrow band is the white layer. During dry cutting, the white layer appears very early. At the beginning of cutting, a thin white layer is produced (due to the high cutting speed used in the experiment). Compared with other parts, the white layer shows With greater density and uniformity, its metallographic structure is difficult to distinguish, and it only appears bright white under the electron scanning electron microscope. The surface hardness of the turning workpiece is about 865 (HV100) on average as measured by the HX-1 microhardness tester.
2. Next to the white layer is the subsurface black layer, which is the structure from the white layer to about 7 μm from the surface, which is relatively dense and slightly darker in color. There is no needle-like martensite in this band. The hardness at 5-7 μm is lower, with an average of 678 (HV50), which is significantly lower than the hardness of the surface structure, forming a softening peak.
3. Below the black layer is a transition zone with a thickness of about 10 μm. Its structure is sparse, and the martensite and carbide structures are coarse.
4. Matrix structure, this part is not affected by the hard cutting process.
When the above 4 layers are dry cutting, the surface layer and sub-surface layer of the workpiece are characterized. With the increase of processing time, the division of these four areas is more obvious, and the thickness of the black layer and the white layer increases with the wear of the tool flank. and gradually increase.
Compared with dry cutting, wet cutting has a relatively low cutting temperature due to the cooling effect of the cutting fluid, only a thin workpiece surface structure is affected, and a blurred white layer is formed at the boundary, and the surface structure is different from the matrix structure. It is not large, which fully shows that the cooling liquid is effective in preventing the formation of white layer and reducing surface and subsurface defects.
3. Surface roughness analysis

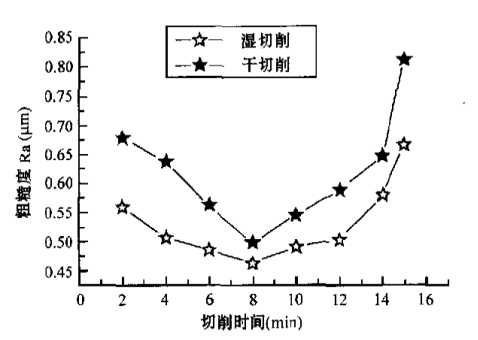
The above picture shows the comparison curve of dry and wet cutting surface roughness, we can find:
(1)
Both dry and wet cutting can obtain good surface roughness, and the surface roughness varies within a small range (Ra=0.4-0.8μm).
(2)
The change trend of surface roughness in dry and wet cutting is similar, and the Ra value of dry cutting surface roughness is slightly higher than that in wet cutting.
(3)
During the machining process, although the higher cutting temperature can soften the workpiece and make it easier to cut, it also has an adverse effect on the surface of the material to be machined.
Words of a family in the battle between dry and wet cutting (Figure 5)
The above pictures are SEM photos of workpiece surface topography in different periods. We can see that the surface of dry cutting workpiece and the surface of wet cutting workpiece mainly have three different characteristics.
First of all, some extremely tiny CBN particles are embedded on the surface of the dry cutting workpiece. This may be due to the adhesive wear on the flank, which makes the CBN particles exposed. Pressed into the workpiece surface, and wet cutting because of the flushing effect of cutting fluid, a small amount of CBN particles are found on the workpiece surface only in the later stage of tool wear.
Secondly, in the later stage of dry cutting, the high temperature and high pressure caused by tool wear make the lateral flow of the surface metal more serious, and the surface becomes rougher, while wet cutting is protected by cutting fluid, the surface morphology is improved, and a lower surface is obtained. roughness.
Again, under dry and wet cutting conditions, the surface of the workpiece has a clear texture, and the difference in texture density is small, but the depth of the texture is different. The degree is different. When the cutting stroke is 900m, the flank wear morphology of dry and wet cutting tools is observed. It is found that the hard points in the workpiece material structure scratch the tool flank with dents of different depths, and these dents are reversed. It is copied to the surface of the workpiece to be processed, and the surface of the flank of the wet cutting tool is smoother, so a better surface is processed.
4.The comprehensive conclusion of the experiment
In this paper, the experimental research on cutting hardened bearing steel GCr15 under dry and wet lubrication conditions of PCBN tool is carried out, and the microstructure of the machined surface is tested, compared and analyzed. The results show that:
1. At a higher cutting speed, a white layer appears on the surface of the workpiece at the initial stage of dry cutting, while in wet cutting, due to the cooling effect of the cutting fluid, no obvious white layer appears before the tool reaches severe wear, indicating a higher cutting speed. Temperature has a great influence on white layer generation.
2. The quality of the machined surface in hard cutting is closely related to the wear of the flank of the tool. With the increase of the wear of the flank, the thickness of the white and black layers on the surface of the machined workpiece gradually increases.
3. The surface roughness Ra value of the workpiece processed under wet cutting conditions is slightly better than that of dry cutting, and within the tool wear range, the surface roughness Ra value changes very little.
4. In order to reduce the defects of the surface layer and the pressed surface layer and obtain a better surface quality, an appropriate amount of cooling and lubrication is necessary.
【Summary of the article】
In this experiment, the surface microstructure of the workpiece after dry and wet machining is very different, so the surface stress state is also significantly different.
According to the previous finding that the reliability of the workpiece to be processed is affected by the microstructure below the surface of the workpiece, it is speculated that the parts processed by dry and wet cutting will show great differences in use, but the effect of the white layer on the life of the parts still needs to be tested in practice. It has been further confirmed in use.
The reason why the title of this article has been added with "a family's words" is that it is indeed difficult to end the debate between hard cutting and wet cutting of PCBN tools with only one experiment, but the author of this article does provide you with a tool life, surface roughness External reference factors: workpiece surface organization. I also hope that you can choose according to specific working conditions in practical applications.
References: Cao Yongquan, "Research on Surface Integrity of Hardened Steel in Dry and Wet Cutting of PCBN Tools"